
This tutorial was written on November 18, 2010 and is of my own imagination. Any resemblance to any other tutorial is pure coincidence. Please do not use the same images/tubes that I have unless you hold the appropriate license to do so.
Supplies Needed:
Kissed By Pix's Christmas Past kit which can be purchased here. Thank you so much for allowing me to use this awesome kit Pix!! Hugz!
Alien Skin Eye Candy Nature Snow Drift
My Snow here.
Tube of choice. I am using the artwork of Marco Guaglione which can be found at MyPSPTubes.
Animation Shop
Font of choice.
Ok ..let's get rockin!!!!
Open a 700x700 blank canvas. Flood fill if you like.
Open a frame of choice and paste as a new layer.
Grab your magic wand and click inside the frame. Selections/Modify/Expand by 5.
Open paper of choice. Paste as a new layer. Selections/Invert and hit the delete key on your keyboard. Selections/None.
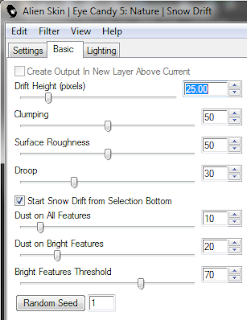
Open one of the trees. Resize as needed. Paste as a new layer. Move to the right side of the frame. Apply the Eye Candy Snow Drift with these settings:
Open your tube of choice. Paste as a new layer and move into position.
Open one of the bows. Resize as needed. Paste and move to your liking.
Open a couple of the beds. Paste as new layers. Move one to the left side of your canvas. Duplicate/Mirror. Repeat with the other set of beads. Move the bead layers down below your paper layer.
Open a ribbon of choice. Resize as needed. Paste as a new layer. Move to the bottom of your canvas. Duplicate/Mirror. Move these to the bottom of your layer palette as well.
Open the sign post. Resize as needed. Paste as a new layer and move into position. I placed my copyright/license information on this layer. Apply the Eye Candy Nature Snow Drift with these settings:
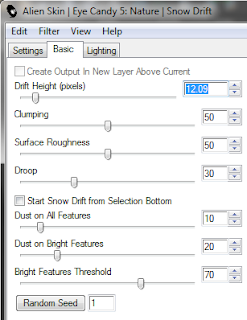
Open the snowman. Resize as needed. Paste as a new layer. Image/Mirror. Move to the right side of your canvas. See my tag as a reference. Apply the Eye Candy Nature Snow Drift with these settings:
Open the elf boy. Resize as needed. Paste as a new layer. Move under your tree layer. Apply Eye Candy Nature Snow Drift with these settings:
Open all the gifts. Resize as needed. Paste as new layers. Move into position.
Drop shadow all your layers that you want to now using your favorite settings.
Add your text with your fave font. Drop shadow.
Ok .. now ... hide your beads, ribbon, and paper layers. Merge visible the rest. Hide that layer and reopen the beads and ribbon layers only. Merge visible.
Reopen the other layers.
Highlight the paper layer. Selections/All/Float/Defloat. Selections/Invert.
Open my Snow file. Highlight the first frame. Copy and paste as a new layer onto your working canvas.
Repeat for each of the snow layers.
Once you've got all the snow layers go back to the first one and hit the delete key on your keyboard. This will remove all of the unnecessary snow from around your frame. Do this with each of the snow layers.
Ok .. Open AS.
Back to PSP. Hide all of the snow layers other than the first one. Copy Merged and paste as a new animation in Animation Shop. Back to PSP.
Hide the first snow layer and open the second. Copy Merged and paste after current frame in AS. Back to PSP.
Repeat for each of the snow layers.
Save as a gif and that's it .. you're all done!
Hope you enjoyed doing this tutorial.
Hugz
Supplies Needed:
Kissed By Pix's Christmas Past kit which can be purchased here. Thank you so much for allowing me to use this awesome kit Pix!! Hugz!
Alien Skin Eye Candy Nature Snow Drift
My Snow here.
Tube of choice. I am using the artwork of Marco Guaglione which can be found at MyPSPTubes.
Animation Shop
Font of choice.
Ok ..let's get rockin!!!!
Open a 700x700 blank canvas. Flood fill if you like.
Open a frame of choice and paste as a new layer.
Grab your magic wand and click inside the frame. Selections/Modify/Expand by 5.
Open paper of choice. Paste as a new layer. Selections/Invert and hit the delete key on your keyboard. Selections/None.
Open one of the trees. Resize as needed. Paste as a new layer. Move to the right side of the frame. Apply the Eye Candy Snow Drift with these settings:

Open your tube of choice. Paste as a new layer and move into position.
Open one of the bows. Resize as needed. Paste and move to your liking.
Open a couple of the beds. Paste as new layers. Move one to the left side of your canvas. Duplicate/Mirror. Repeat with the other set of beads. Move the bead layers down below your paper layer.
Open a ribbon of choice. Resize as needed. Paste as a new layer. Move to the bottom of your canvas. Duplicate/Mirror. Move these to the bottom of your layer palette as well.
Open the sign post. Resize as needed. Paste as a new layer and move into position. I placed my copyright/license information on this layer. Apply the Eye Candy Nature Snow Drift with these settings:

Open the snowman. Resize as needed. Paste as a new layer. Image/Mirror. Move to the right side of your canvas. See my tag as a reference. Apply the Eye Candy Nature Snow Drift with these settings:
Open the elf boy. Resize as needed. Paste as a new layer. Move under your tree layer. Apply Eye Candy Nature Snow Drift with these settings:
Open all the gifts. Resize as needed. Paste as new layers. Move into position.Drop shadow all your layers that you want to now using your favorite settings.
Add your text with your fave font. Drop shadow.
Ok .. now ... hide your beads, ribbon, and paper layers. Merge visible the rest. Hide that layer and reopen the beads and ribbon layers only. Merge visible.
Reopen the other layers.
Highlight the paper layer. Selections/All/Float/Defloat. Selections/Invert.
Open my Snow file. Highlight the first frame. Copy and paste as a new layer onto your working canvas.
Repeat for each of the snow layers.
Once you've got all the snow layers go back to the first one and hit the delete key on your keyboard. This will remove all of the unnecessary snow from around your frame. Do this with each of the snow layers.
Ok .. Open AS.
Back to PSP. Hide all of the snow layers other than the first one. Copy Merged and paste as a new animation in Animation Shop. Back to PSP.
Hide the first snow layer and open the second. Copy Merged and paste after current frame in AS. Back to PSP.
Repeat for each of the snow layers.
Save as a gif and that's it .. you're all done!
Hope you enjoyed doing this tutorial.
Hugz


1 comment:
Nickie, I need for you to get in touch with me!
Post a Comment