This tutorial was written on November 11, 2010 and is of my own imagination. Any resemblance to any other tutorial is pure coincidence. Please do not use the same images/tubes that I have unless you hold the appropriate license to do so.
Supplies Needed:
Kissed By Pix Autumn Splendor which can be purchsed here. Thank you so much Pixie for allowing me to use this awesome kit.
My film frame here.
Mura Meister Clouds which I uploaded to my 4Shared here.
Becky Mask 22 which you can get here.
Font of choice. I used Rob Leuschke Lavishly Yours.
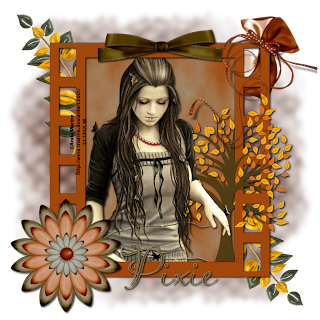
Here are the colors that I used in this tag.

Ok .. let's get rockin'!!
Open a 700x700 blank canvas and flood fill with white if you prefer.
Open a paper of choice. I used paper 3 from the Autumn Splendor kit. Resize as needed. Paste as a new layer.
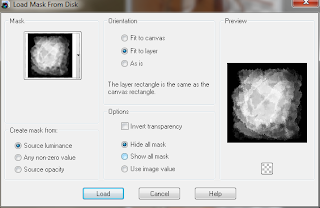
Apply your mask with these settings:

Merge group. Move to the top right a bit. Image/Duplicate/Mirror/Flip.
Open my film frame. Paste as a new layer. Rotate by 90 degrees.
Selections/Float/Defloat.
Open a paper of choice. I used paper 9a. Paste as a new layer and then hit the delete key on your keyboard. Selections/None.
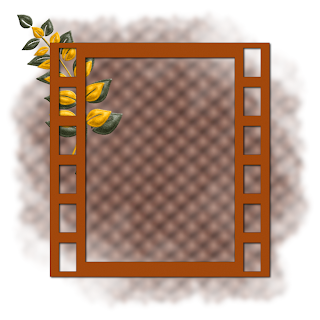
With your selection tool make a selection around the frame like so:

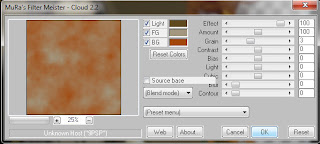
Open another paper of choice. I used paper 7. Selections/Invert and hit the delete key on your keyboard. Selections/Invert again and apply Mura Meister Clouds with these settings:

Selections/None.
You can delete the original frame layer now.
Open a couple of the leaves. I used Leaves6 and Leaves3. Resize as needed. Paste as new layers. Mirror one of the leaf layers and move to the top right corner of the frame. Resize the other leaf down a bit more and mirror it. Move it on top of the other leaf like so:

Merge down. Duplicate/Mirror/Invert.
Open the tree and resize as needed. Paste as a new layer and move towards the bottom right of the frame. Now I actually duplicated this and moved one copy on top of the frame layer and selected different portions of the tree to erase so that it looked as if the tree was winding through the film sides. This is entirely up to you.
Open your tube of choice. Paste as a new layer and move under your frame layer.
Open a bow of choice. I used Bow2. Resize as needed and paste as a new layer. Move to the top center of the frame.
Open three different flowers of choice. Resize as needed. Paste as new layers and move to the bottom left of the frame. Be sure to resize the middle and top flowers down a bit more so as they stack on top of each other. See my tag as a reference.
Open a brad of choice. Resize. Paste as a new layer and move to the center of the flowers.
Open one of the bags. I used bag3. Resize. Paste as a new layer. Rotate to the right by 25. Move down under your paper layers. See my tag as a reference.
Open ribbon of choice and resize as needed. Paste as a new layer. Move to the top of your layer palette and rotate as needed. See my tag for reference.
Drop shadow any and all layers that you like.
If you're going to resize then do so now please.
Add your copyright/watermark in a clear and legible font.
Add any text that you like now.
And ... that's it! Hope you enjoyed doing this tutorial!
Hugz!


No comments:
Post a Comment