
Supplies Needed:
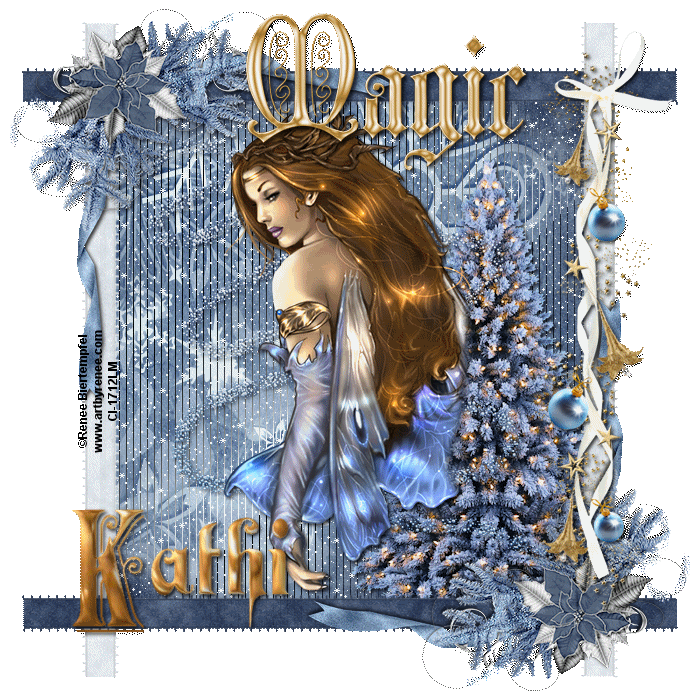
Kissed by Cari's wonderful Magic of Christmas scrap kit which can be purchased here. Thank you for allowing me to use this awesome kit girlie!!!!!!!
Tube of choice. I am using the wonderful artwork of Renee Biertempfel. You can see more of her work and purchase her tubes at CILM.
Jasc Animation Shop 3
Becky Mask 22
Waterlily font
My Snow here.
Tramages Tow The Line filter here
Alien Skin Eye Candy5 Impact Chrome for your name if you like.
Ok .. let's get rockin'!!!!!
Open a 700x700 blank canvas and flood fill with white if you desire.
Open a couple of ribbons of choice. Paste as new layers and resize as needed. Rotate one 90 degrees. Move one to the top of the canvas and the other to the side. See mine as a reference. We're going to make our frame from these ribbons.
Open a corner ribbon of choice. I used corner1. Resize as needed and paste as a new layer. Move to the top left of your canvas.
Merge the corner ribbon and your two flat ribbons together. Duplicate/Mirror/Flip.
TaDa! lol you have your frame.
Grab your selection tool and make a selection around your frame like so:

Open a paper of choice. I used paper1. Paste as a new layer and apply the mask with these settings:

Merge the group.
Selections/Invert and hit the delete key on your keyboard. DO NOT deselect just yet.
Open another paper of choice. Paste as a new layer. Hit the delete key. Selections/None.
Move this paper down under your masked layer.
Highlight the mask layer in your layer palette. Apply Tramages Tow The Line with these settings:

Open the tree and resize as needed. Paste as a new layer and move to the bottom right of your tag. Move this layer under your frame layer.
Open one of the Ice. Resize if needed. Paste as a new layer.
Open one of the hanging decorations. Resize. Paste as a new layer and move to the left top corner.
Open one of the word arts. Resize as needed. Paste as a new layer and place to your liking.
Open your tube of choice. Paste as a new layer and place where you like.
Drop shadow any and all layers now if you like.
Add your copyright/license information now in a clear and legible font.
Add your name using your favorite font. You can add the chrome effect using thse settings if you like:

I also added an inner bevel to the name with these settings:

Ok .. now .. close off the bottom two paper layers and merge visible the rest.
Reopen the paper layers.
Once again grab your selection tool and make a selection around the frame area of your tag like so:

Selections/Invert
Now comes the hard part :)
Open Animation Shop.
Back to PSP
Open the Snow file that I included above.
Copy frame 1. Back to your working canvas. Paste as a new layer above your paper layers and below your framed tag.
Copy frame 2. Paste as a new layer.
Repeat for the next 8 layers of show.
Once you have all 10 layers pasted onto your working canvas start at the top and work your way down to the first layer of snow. Hit the delete key on your keyboard for each layer.
Selections/None.
Close off snow layers 2-10.
Highlight your framed tag layer. Copy.
Back to AS.
Paste as a new Animation. Back to PSP.
Close off snow 1 and open snow 2. Copy.
Back to AS.
Paste After Current Frame. Back to PSP.
Repeat the above steps for the other 8 layers of snow.
In AS, File/Save As/ and use these settings:


And that's it! Hope you enjoyed doing this tutorial.
Hugz


1 comment:
Thank you so much for this post. I want to let you know that I posted a link to your blog in CBH Digital Scrapbooking Freebies, under the Page 1 post on Nov. 12, 2010. Thanks again.
Post a Comment