I've really been thinking about writing tutorials once again since I am no longer able to work. If I can manage to come up on some newer scrap kits then I will see what I can come up with and of course post on here. If anyone has any links to scrap kits that are free or anyone that is looking for a new addition to their CT team I'd love to know. Just leave a comment below.
Lots of love and hugs
Nickie
Thursday, August 27, 2015
Friday, August 26, 2011
My big fat Cedar Woman Giveaway!!
August 24, 2011 6:06 PMPosted By Debra Shiveley Welch
The rules are simple.
Buy a copy of Cedar Woman and begin to read. Cedar Woman is available through Amazon and Barns&Noble. Use the comment feature below to register simply by posting somthing like, "I'm in," and emailing me privately with the first sentence of chapter one. You can get my email address at the upper right hand corner where it says "read more."
I will announce a week ahead of when the contest will begin.
There will be a prize for every chapter. Each prize is of the same value, or more, as the book.
A question will be asked from each chapter. Those who answer correctly (through private email to me) will be put into a hat and the winner drawn.
Good luck!
Prizes include authentic Native American jewelry complete with certificates of authenticity
An authentic powwow shawl
Native American hair ornament
A new, never opened Logitech Web Cam
And more.
The prize for chapter one will be a set of Niegellia Lawsons measuring cups. A $35.00 value.
Monday, December 6, 2010
My Sister .. or one of them at least :P
Ok .. this is totally not designz, tutorial, scrapkit, or anything like that related. But I wanted to share with you my sister Debra. She is an amazing author and is about to release a new book entitled Cedar Woman. I've received a copy of it and am totally loving it!!! Here's the book cover and please I ask that you follow the link below and check out her other books and the story of my nephew Christopher!

From what I've read so far .. this will be a best seller and a must for all to read! So please go to my sister's site and have a look around and if you care to pre-order Cedar Woman today.
Hugz!!!
p.s. I am portrayed in the book in a small way. I thank you Debra for that!!! Mitakuye Oyasin Tanksa!
Hugz!!!
p.s. I am portrayed in the book in a small way. I thank you Debra for that!!! Mitakuye Oyasin Tanksa!
Friday, November 19, 2010
My Addiction

This tutorial was written on November 19, 2010 and is of my own imagination. Any resemblance to any other tutorial is pure coincidence. Please do not use the same images/tubes that I have unless you hold the appropriate license to do so.
Supplies Needed:
Treasures by Terry's My Addiction kit which can be purchased here and here. Thank you so much Terry for allowing me to use this awesome and bountiful kit!!! Hugz!
Becky Mask 22
Font of choice.
Ok .. let's get rockin!!
Open a 700x700 blank canvas and flood fill with white if desired.
Open a paper of choice and apply the mask with these settings.

Open one of the glitter dots. Paste as a new layer. Move to the top right of the mask area.
Duplicate/Mirror/Flip.
Open one of the doodles. Move to the right of the canvas a bit. Duplicate/Mirror/Flip.
Open one of the frames. I used frame 8. Paste as a new layer. Grab your rectangle selection tool and make a selection around the frame like so:

Open a paper of choice. Paste as a new layer. Selections/Invert and hit the delete key on your keyboard. Selections/None. Move this layer down below your frame layer.
Highlight the frame again.
Open another frame of choice. I used frame 11. Paste as a new layer on top of the other frame.
Open all three fans. Paste as new layers. Resize one of them by 80 and the other by 70. Drop shadow the top two fans. Merge down and merge down again. Rotate to the left by 40 degrees and move down to the bottom right corner of the frame.
Open a flower of choice. I used flower 9. Resize down by 80 or so. Rotate to the right by 40 degrees and place on top of the fans.
Open a butterfly of choice. I used butterfly1. Resize down a bit. Rotate to the left by 40 and place on the bottom of the fans.
Open a heart charm of choice. Resize down and paste as a new layer. Move down under your flower layer and place into position. See my tag as a reference.
Open a candle(s) of choice. Paste as a new layer and move to the lower left of your tag.
Open your tube of choice and place into position.
Drop shadow any and all layers that you'd like.
If you are going to resize do so now please.
Add your copyright/license information in a clear and legible font.
Add your text using colors from the tag and in your favorite font. Drop shadow.
That's it! Hope you enjoyed doing this tutorial.
Hugz
Thursday, November 18, 2010
Desktop Images Freebie
Ok ... how about a freebie!
I've been playing around with some desktop images. And want to share one with you now. It can be downloaded here.
Please .. if you download it be sure to leave some love letting me know.
Here's a preview of it and I hope you enjoy it. It's not much .. just a simple image.
I've been playing around with some desktop images. And want to share one with you now. It can be downloaded here.
Please .. if you download it be sure to leave some love letting me know.
Here's a preview of it and I hope you enjoy it. It's not much .. just a simple image.

Christmas Past
This tutorial was written on November 18, 2010 and is of my own imagination. Any resemblance to any other tutorial is pure coincidence. Please do not use the same images/tubes that I have unless you hold the appropriate license to do so.
Supplies Needed:
Kissed By Pix's Christmas Past kit which can be purchased here. Thank you so much for allowing me to use this awesome kit Pix!! Hugz!
Alien Skin Eye Candy Nature Snow Drift
My Snow here.
Tube of choice. I am using the artwork of Marco Guaglione which can be found at MyPSPTubes.
Animation Shop
Font of choice.
Ok ..let's get rockin!!!!
Open a 700x700 blank canvas. Flood fill if you like.
Open a frame of choice and paste as a new layer.
Grab your magic wand and click inside the frame. Selections/Modify/Expand by 5.
Open paper of choice. Paste as a new layer. Selections/Invert and hit the delete key on your keyboard. Selections/None.
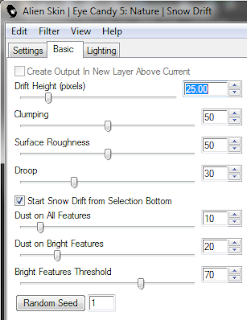
Open one of the trees. Resize as needed. Paste as a new layer. Move to the right side of the frame. Apply the Eye Candy Snow Drift with these settings:
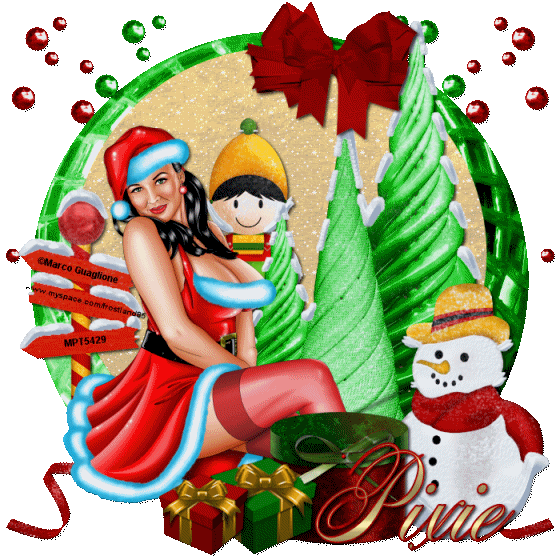
Open your tube of choice. Paste as a new layer and move into position.
Open one of the bows. Resize as needed. Paste and move to your liking.
Open a couple of the beds. Paste as new layers. Move one to the left side of your canvas. Duplicate/Mirror. Repeat with the other set of beads. Move the bead layers down below your paper layer.
Open a ribbon of choice. Resize as needed. Paste as a new layer. Move to the bottom of your canvas. Duplicate/Mirror. Move these to the bottom of your layer palette as well.
Open the sign post. Resize as needed. Paste as a new layer and move into position. I placed my copyright/license information on this layer. Apply the Eye Candy Nature Snow Drift with these settings:
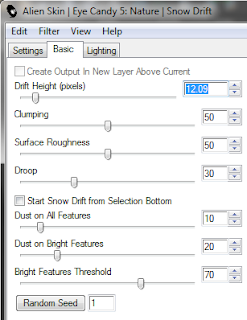
Open the snowman. Resize as needed. Paste as a new layer. Image/Mirror. Move to the right side of your canvas. See my tag as a reference. Apply the Eye Candy Nature Snow Drift with these settings:
Open the elf boy. Resize as needed. Paste as a new layer. Move under your tree layer. Apply Eye Candy Nature Snow Drift with these settings:
Open all the gifts. Resize as needed. Paste as new layers. Move into position.
Drop shadow all your layers that you want to now using your favorite settings.
Add your text with your fave font. Drop shadow.
Ok .. now ... hide your beads, ribbon, and paper layers. Merge visible the rest. Hide that layer and reopen the beads and ribbon layers only. Merge visible.
Reopen the other layers.
Highlight the paper layer. Selections/All/Float/Defloat. Selections/Invert.
Open my Snow file. Highlight the first frame. Copy and paste as a new layer onto your working canvas.
Repeat for each of the snow layers.
Once you've got all the snow layers go back to the first one and hit the delete key on your keyboard. This will remove all of the unnecessary snow from around your frame. Do this with each of the snow layers.
Ok .. Open AS.
Back to PSP. Hide all of the snow layers other than the first one. Copy Merged and paste as a new animation in Animation Shop. Back to PSP.
Hide the first snow layer and open the second. Copy Merged and paste after current frame in AS. Back to PSP.
Repeat for each of the snow layers.
Save as a gif and that's it .. you're all done!
Hope you enjoyed doing this tutorial.
Hugz
Supplies Needed:
Kissed By Pix's Christmas Past kit which can be purchased here. Thank you so much for allowing me to use this awesome kit Pix!! Hugz!
Alien Skin Eye Candy Nature Snow Drift
My Snow here.
Tube of choice. I am using the artwork of Marco Guaglione which can be found at MyPSPTubes.
Animation Shop
Font of choice.
Ok ..let's get rockin!!!!
Open a 700x700 blank canvas. Flood fill if you like.
Open a frame of choice and paste as a new layer.
Grab your magic wand and click inside the frame. Selections/Modify/Expand by 5.
Open paper of choice. Paste as a new layer. Selections/Invert and hit the delete key on your keyboard. Selections/None.
Open one of the trees. Resize as needed. Paste as a new layer. Move to the right side of the frame. Apply the Eye Candy Snow Drift with these settings:

Open your tube of choice. Paste as a new layer and move into position.
Open one of the bows. Resize as needed. Paste and move to your liking.
Open a couple of the beds. Paste as new layers. Move one to the left side of your canvas. Duplicate/Mirror. Repeat with the other set of beads. Move the bead layers down below your paper layer.
Open a ribbon of choice. Resize as needed. Paste as a new layer. Move to the bottom of your canvas. Duplicate/Mirror. Move these to the bottom of your layer palette as well.
Open the sign post. Resize as needed. Paste as a new layer and move into position. I placed my copyright/license information on this layer. Apply the Eye Candy Nature Snow Drift with these settings:

Open the snowman. Resize as needed. Paste as a new layer. Image/Mirror. Move to the right side of your canvas. See my tag as a reference. Apply the Eye Candy Nature Snow Drift with these settings:
Open the elf boy. Resize as needed. Paste as a new layer. Move under your tree layer. Apply Eye Candy Nature Snow Drift with these settings:
Open all the gifts. Resize as needed. Paste as new layers. Move into position.Drop shadow all your layers that you want to now using your favorite settings.
Add your text with your fave font. Drop shadow.
Ok .. now ... hide your beads, ribbon, and paper layers. Merge visible the rest. Hide that layer and reopen the beads and ribbon layers only. Merge visible.
Reopen the other layers.
Highlight the paper layer. Selections/All/Float/Defloat. Selections/Invert.
Open my Snow file. Highlight the first frame. Copy and paste as a new layer onto your working canvas.
Repeat for each of the snow layers.
Once you've got all the snow layers go back to the first one and hit the delete key on your keyboard. This will remove all of the unnecessary snow from around your frame. Do this with each of the snow layers.
Ok .. Open AS.
Back to PSP. Hide all of the snow layers other than the first one. Copy Merged and paste as a new animation in Animation Shop. Back to PSP.
Hide the first snow layer and open the second. Copy Merged and paste after current frame in AS. Back to PSP.
Repeat for each of the snow layers.
Save as a gif and that's it .. you're all done!
Hope you enjoyed doing this tutorial.
Hugz
Scarlett Rose

This tutorial was written on November 18, 2010 and is of my own imagination. Any resemblance to any other tutorial is pure coincidence. Please do not use the same images/tubes that I have unless you hold the appropriate license to do so.
Supplies Needed:
Treasures by Terry Gothic Rose kit which can be found here and here. Thank you so much for allowing me to use this awesome kit girlie!!!!! Muahhhh!
Tube of choice. I'm using the artwork of Keith Garvey which can be found at MyPSPTubes.
Alien Skin Eye Candy 5 Nature
Mura Meister Clouds
Font of choice. I'm using Lover's Quarrel.
Ok let's get rockin!!!!!!
Open a 700x700 blank canvas. Flood fill with white if you like. We can crop and resize later.
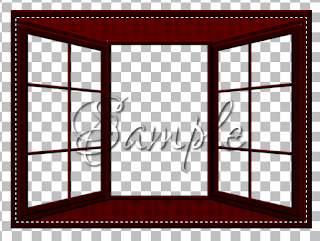
Open the window from the kit. Paste as a new layer.
Grab your rectangle selection tool and make a selection around the window like so:
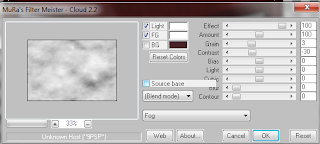
 Open a paper(s) of choice. I used two different ones, paper 11 and 27. Paste the darker one first then the lighter one. Selections/Invert and hit the delete key on your keyboard. Selections/Invert again so that the top lighter paper is selected.
Apply Mura Meister Cloud with these settings:
Use Alien Skin Eye Candy Nature Water Drops with these settings:
 While still selected go to Effects/Distortion Effects/Wind and use these settings:
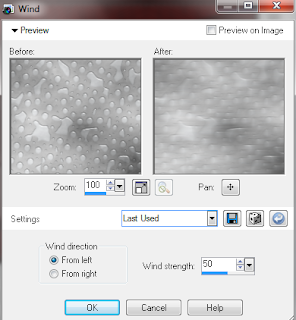 Repeat but change the direction to the right. Selections/None. Lower the opacity of this layer to around 75 or so.
Open one of the lounges. Resize as needed and paste to your liking as a new layer. Drop shadow using your favorite settings.
Open an urn of choice. Resize by 50 and paste as a new layer. Move into place. Repeat drop shadow.
Open one of the crows and resize by 50. Paste as a new layer and move into place. Repeat drop shadow.
Open one of the curtains. Resize if needed. Paste as a new layer over the window. Repeat drop shadow.
Open a rose of choice. I used one of the corner ones and resize by 30. Paste as a new layer. Move to the top left corner of the curtain. Repeat the drop shadow. Duplicate/Mirror.
Open both Rose 7 and 8. Resize as needed and paste as new layers. Rotate one 90 to the left and the other 90 to the right. Place under the urn. Repeat drop shadow.
Open a candle of choice. I used candle 2. Resize by 60. Paste as a new layer. Move to one side of the curtain. Repeat the drop shadow. Duplicate/Mirror.
Open your tube of choice. Resize if needed. Paste as a new layer. Move where you like. Repeat drop shadow.
Add your text in your favorite font. Drop shadow.
If you are going to resize/crop please do so now.
Add your copyright/license information in a clear and legible font.
That's it! Hope you enjoyed doing this tutorial.
Hugz
Supplies Needed:
Treasures by Terry Gothic Rose kit which can be found here and here. Thank you so much for allowing me to use this awesome kit girlie!!!!! Muahhhh!
Tube of choice. I'm using the artwork of Keith Garvey which can be found at MyPSPTubes.
Alien Skin Eye Candy 5 Nature
Mura Meister Clouds
Font of choice. I'm using Lover's Quarrel.
Ok let's get rockin!!!!!!
Open a 700x700 blank canvas. Flood fill with white if you like. We can crop and resize later.
Open the window from the kit. Paste as a new layer.
Grab your rectangle selection tool and make a selection around the window like so:
 Open a paper(s) of choice. I used two different ones, paper 11 and 27. Paste the darker one first then the lighter one. Selections/Invert and hit the delete key on your keyboard. Selections/Invert again so that the top lighter paper is selected.
Apply Mura Meister Cloud with these settings:

Use Alien Skin Eye Candy Nature Water Drops with these settings:
 While still selected go to Effects/Distortion Effects/Wind and use these settings:
 Repeat but change the direction to the right. Selections/None. Lower the opacity of this layer to around 75 or so.
Open one of the lounges. Resize as needed and paste to your liking as a new layer. Drop shadow using your favorite settings.
Open an urn of choice. Resize by 50 and paste as a new layer. Move into place. Repeat drop shadow.
Open one of the crows and resize by 50. Paste as a new layer and move into place. Repeat drop shadow.
Open one of the curtains. Resize if needed. Paste as a new layer over the window. Repeat drop shadow.
Open a rose of choice. I used one of the corner ones and resize by 30. Paste as a new layer. Move to the top left corner of the curtain. Repeat the drop shadow. Duplicate/Mirror.
Open both Rose 7 and 8. Resize as needed and paste as new layers. Rotate one 90 to the left and the other 90 to the right. Place under the urn. Repeat drop shadow.
Open a candle of choice. I used candle 2. Resize by 60. Paste as a new layer. Move to one side of the curtain. Repeat the drop shadow. Duplicate/Mirror.
Open your tube of choice. Resize if needed. Paste as a new layer. Move where you like. Repeat drop shadow.
Add your text in your favorite font. Drop shadow.
If you are going to resize/crop please do so now.
Add your copyright/license information in a clear and legible font.
That's it! Hope you enjoyed doing this tutorial.
Hugz
Subscribe to:
Comments (Atom)